By default, Windows 10 sends updates to every device automatically to ensure the highest performance, reliability, and security. These updates, however, require an automatic reboot that may take a long time to complete or cause various system-related issues. With that, many users are wondering if there is a way to pause or fully disable automatic updates to prevent them from interfering with their everyday work.
Below are the five proven ways to stop automatic updates on Windows 10.
Pause automatic updates using Windows Settings
If you don’t want to completely turn off automatic updates you can pause them for up to 35 days using the Windows Settings app.
- Go to Settings > Update & Security > Windows Update > Advanced options.
- Select a specific date from the Pause until drop-down menu located under the Pause updates section. Your computer will not receive any updates until the date you specified.
Looking for an easy solution to fix Windows issues remotely? FixMe.IT is the world’s #1 rated remote support app that allows to connect to any remote PC in 3 easy steps. Click here to see how it works.
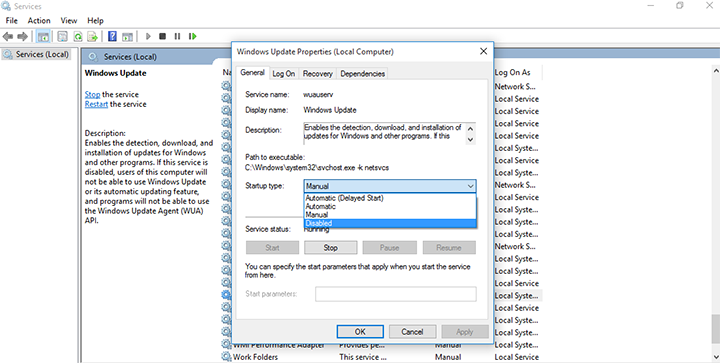
Turn off automatic updates using Services
- Hit Win+R to open the Run box.
- Type in services.msc to open Services.
- Double-click the Windows update service.
- On the General tab, locate the Startup type option and select Disabled from the drop-down menu.
- Restart your computer to save the changes.
To re-enable automatic updates, complete steps 1-4, then select Automatic from the Startup type drop-down menu and restart your machine.
Disable automatic updates using Windows Registry
On Windows 10 Pro, you can permanently disable automatic updates by modifying the Windows Registry.
- Press Win+R to open the Run box.
- Type in regedit to open the Windows Registry.
- Navigate to HKEY_LOCAL_MACHINE\SOFTWARE\Policies\Microsoft\Windows
- Create a new key within the Windows folder. To do that, right-click the folder, then select New > Key. Name the new key as Windows Update.
- Create a new key within the Windows Update folder and name it AU.
- Within the AU folder, create a DWORD (32-bit value) named NoAutoUpdate. Change the value of this key from 0 to 1.
You will need to restart your device to save the changes. Once you do that, automatic updates will be completely disabled on our computer.
Disable automatic updates via Group Policy Editor
On Windows 10 Pro/Enterprise, you can turn off automatic updates using the Group Policy Editor. After completing these steps you will still be able to manually check for updates as well as install security patches from Settings > Updates & Security > Windows Update.
- Open the Run box by pressing Win+R and type in gpedit.msc.
- Navigate to Computer Configuration\Administrative Templates\Windows Components\Windows Update
- Open the Configure Automatic Updates policy.
- Check the Disabled radio button to disable updates.
- Click Apply, then click OK.
Disable specific updates using WUSHOWHIDE utility
- Download the WUSHOWHIDE troubleshooter from Microsoft Download Center.
- Run wushowhide.diagcab on your device and follow the on-screen instructions.
- Select Advanced and uncheck the Apply repairs automatically box. Click Next.
- Click the Hide Updates to select a specific update that you want to block. Note that the update needs to be downloaded to your device in order to be disabled via WUSHOWHIDE.
Did you find this article helpful? See more Windows tips & tricks on our blog and join us on Facebook, Twitter or LinkedIn to get all the latest updates as they happen.
Learn More About FixMe.IT