• Skip to primary navigation
  • Skip to main content
  • Skip to primary sidebar
  • Skip to footer

Techinline Blog

Remote Support Software Explained

SetMe
Remote Support Software That Always Works
Sign up
Techinline Blog
  • Product
  • Features
  • Pricing
  • How It Works

How to Disable Reserved Storage on Windows 10

July 18, 2019 by Dan Kukarsky

Reserved Storage is a newly added feature available on Windows 10 1903 which reserves up to 7GB of your device’s storage for updates and temporary files. Reserved Storage was designed to help you avoid problems that may result from not having enough space when upgrading to a newer version of Windows.

You might, however, want to disable Reserved Storage if your device doesn’t have much space or if you simply don’t like the new feature. Here’s how you can do that.

  1. Press Win+R to run the Run box. Type regedit and click OK to open the Windows Registry.
  2. Navigate to HKEY_LOCAL_MACHINE\SOFTWARE\Microsoft\Windows\CurrentVersion\ReserveManager
  3. Double-lick the ShippedWithReserves key and change its value from 1 to 0.
  4. Click OK.
  5. Reboot your machine. Note that Reserved Storage won’t be disabled until the next upgrade.


Looking for an easy solution to fix Windows issues remotely? FixMe.IT is the world’s #1 rated remote support app that allows to connect to any remote PC in 3 easy steps. Click here to see how it works.

To re-enable Reserved Storage, go through steps 1-3 and change the value of the ShippedWithReserves key back from 0 to 1.

Here’s what to do if you want to check whether Reserved Storage has been disabled:

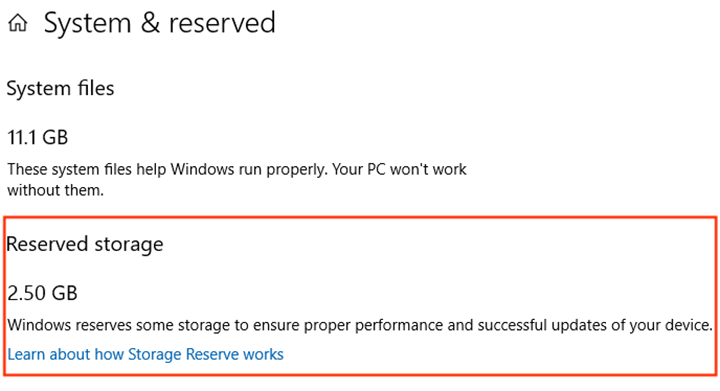
  1. Go to Settings > System > Storage, then click on the Show more categories link.
  2. Choose System & reserved.
  3. If Reserved Storage has been successfully disabled, the “Reserved Storage” section shown on the screenshot below should not be available in the settings menu.
Disable Reserved Storage on Windows 10 1903

Did you find this post helpful? Find more Windows tips & tricks on our blog and follow us on Facebook, Twitter or LinkedIn to get all the latest updates as they happen.

Try FixMe.IT Free

Related Posts

  • How to Disable or Uninstall Windows Store in Windows 10
  • How to Disable Cortana on Windows 10
  • How to Disable Quick Access in Windows 10 File Explorer

Filed Under: Windows Tips & Tricks Tagged With: Reserved Storage, Windows 10

Primary Sidebar

Most Popular

Meet SetMe Solo: Ideal Pricing Plan for Individual & Small Businesses

New SetMe Features: In-Session Unattended Setup, Screen Blanking for Mac & More

SetMe's Unattended Access Is Here

New SetMe Feature: Disable Remote Input

Chrome Remote Desktop Review: The Pros & Cons

Best Remote Desktop Software for Mac in 2024

Subscribe to Newsletter

loader

Follow Us

Recent Posts

  • How to Restart a Remote Computer (the Easy Way with SetMe) May 2, 2025
  • Best Remote Desktop Software for Windows 11 (2025 Edition) April 30, 2025
  • How to Check if a Windows Server or PC Is Domain-Joined (All Methods) April 23, 2025
  • Remotely Access Headless Computers with SetMe April 18, 2025
  • How to Run PowerShell as Administrator (Windows 10 & 11) April 10, 2025
  • SetMe Recognized with Multiple Accolades from Capterra, Software Advice and GetApp in 2025 March 27, 2025

Footer

Product

  • Features
  • Pricing
  • How It Works
  • Security

Resources

  • Product Roadmap
  • Help Center

Try It Free

Do you enjoy reading our posts? You might also like our remote support app. Give it a try, it's free for 15 days:

Try SetMe Free

© 2025 · Techinline Ltd. · Built on the Genesis Framework